
Introduction
This will be the final article of the series Road to PactFlow Enterprise (at least for now…). And as a finishing step, after covering more high-level topics, today we will be talking about a technical mandatory configuration that you will need to complete in your PactFlow instance: SAML SSO configuration.
SAML (Security Assertion Markup Language) is an open standard used to exchange authentication and authorization information between two components: an Identity Provider (IdP) and a Service Provider (SP). This standard allows us to implement Single Sign On (SSO) and centralize the authentication process, having only one source of truth related to the identities of our users.
You are probably familiar with this authentication scheme, as there are a lot of websites that allow you to log in to their services using your Google or GitHub account as the identity provider. In fact, these are the two identity providers accepted by PactFlow in all the subscription tiers. To use SAML SSO with a Custom Identity Provider, you should have the enterprise plan.
In this article, we will be talking about On-Premise PactFlow installations, and focusing on the PactFlow side configuration. The identity provider could be Ping, Okta, Auth0, or Azure AD. It does not matter for the content of this article. But just to satisfy your curiosity, I have been mainly working with Ping.
As it’s common in these articles, you can think of our role within the company as the PactFlow team. We provide the platform that enables the development teams to use contract testing.
Why is this interesting?
There is not a lot of information out there about how to configure SAML SSO in your PactFlow On-Premise instances.
If you are familiar with PactFlow, you will know that basic authentication is highly discouraged. Actually, PactFlow has recently renamed it to Demo authentication, so it’s hard to be more specific about the use cases for this type of authentication.
For that reason, the only recommended way of configuring the authentication in PactFlow without relying on Google or GitHub is using SAML (either SaaS or On-Premise).
Using SAML, we can implement SSO in our PactFlow instance using our own IdP. This is a huge advantage (or we might even say “a requirement”) for any enterprise environment. Not only because PactFlow requires it, but also because you don’t want to force your users to remember multiple user/password combinations.
Where can you apply it?
The only requirement is to have an enterprise PactFlow license. Once you have that kind of plan, you should be set to configure your own SAML identity provider. The process differs slightly depending on whether you’re dealing with PactFlow SaaS or On-Premise.
Saas
If you’re using the SaaS option, you won’t have to struggle with any PactFlow configuration. All the work on your side would be done in the identity provider tool. PactFlow will configure its end to be able to integrate with your IdP platform. The documentation provided by PactFlow is pretty detailed, and you will be working directly with them to have the SaaS instance running.
On-premise
Here the situation changes: you will be responsible for configuring both ends, the IdP and the SP (PactFlow). Usually, large companies have a specific department for the identity management platform, as mentioned above, we are the team responsible for PactFlow so we will focus on that in the following sections: how to configure SAML SSO in PactFlow.
How does it work?
Before explaining the configuration steps, it might be useful to visualize how the SAML SSO configuration process works and is implemented with PactFlow.
Supported features
- SP-initiated login: The login flow is started by PactFlow, at present, the IdP-initiated login is not supported.
- Authorization from an external IdP: PactFlow will be able to assign roles and teams to the users based on the authorization/entitlements existing on your IdP/AD. Any update on the IdP will be reflected in PactFlow, including the deactivation of access. This feature requires the SCIM API configuration.
- Automated user provisioning: The users can be automatically provisioned in PactFlow when created in your IdP service. Again, this feature requires the SCIM API configuration.
Unsupported features
- IdP-initiated login: The login process should be initiated by PactFlow.
- SP-initiated logout flow: This feature, which would allow the SP to initiate a logout that logs the user out of all the parties in the current session (other SPs), is not supported.
- Automated user deletion: Even though the users will lose access to PactFlow if the defined entitlement is revoked, the user will still exist in the platform. This feature requires the SCIM API configuration.
SCIM API & Authorization
As you can see, some of the most interesting features depend on the SCIM API. This is a recent feature introduced by PactFlow in December 2022. I’m beginning the process of incorporating this API with one of our largest contract testing clients. I’ll create a new entry in this blog to give our opinion and some advice on the configuration once we have completed the provisioning of the SCIM API.
However, you should be aware that when configuring SAML SSO you are configuring just the authentication. But all the authorization and fine-grained permissions are managed within your PactFlow instance by an Administrator. That means that anyone that has successfully logged in to the IdP will have basic access to PactFlow, then an Administrator should provide the roles or teams needed. The initial role assigned to a new user can be configured in the PactFlow admin section. This is how PactFlow works nowadays, at least until you start using the brand-new SCIM API.
Anyway, there are always workarounds for everything, for example, if you are using an identity management tool like Ping you can always require to filter your access based on an AD group. For example, create an entitlement for accessing your PactFlow instances in non-prod and a different one for prod. Using that information, Ping itself will block access to non-allowed users. But remember, this is just a workaround, PactFlow wouldn’t be handling anything related to authorization.
Login process flow
As mentioned above, PactFlow only supports the SP-initiated login. This means that the SP, PactFlow, will start the request of authentication against the IdP.

-
The users access PactFlow using the DNS/FQDN
https://<your PactFlow host>. They will find a landing page with a SSO Login button. -
The SSO Login button will redirect users to the configured SAML target URL (the IdP Provider). At this point is when the SSO happens, verifying that the user is allowed to access the platform.
-
The IdP Provider then posts the SAML assertion to PactFlow, communicating with the SAML callback endpoint::
https://<your PactFlow host>/auth/saml/callback -
If authorized, PactFlow will redirect the users back to the landing page. If not, the custom error from the IdP provider will be shown.
Steps for SAML SSO configuration in PactFlow
The onboarding process for a new SP in an IdP service can be initiated in two different ways
- Initiated in the IdP
It means that the IdP provider preconfigures PactFlow as SP and provides the metadata to the PatFlow team, so they can include the full SAML configuration in their first deployment.
- Initiated in the SP
PactFlow must be deployed with an incomplete SAML configuration to have available the SP metadata URL. Then this information is provided to the IdP service to configure PactFlow as SP.
In my experience, the second approach is more commonly used in enterprise environments. So I’ll cover that process in this section. Anyway, using one or another approach “only” impacts saving the initial “dummy” deployment of PactFlow, and this guide would be still useful. I would like to highlight the “only” because when you’re working in very strict environments the “dummy” deployment can imply some extra processes and a significant time lost. Having that in mind, there are some tricks we can use to save some time in upper environments. We’ll discuss this when we reach that stage in the process description.
1. Dummy PactFlow deployment
This phase will imply the deployment of PactFlow with the minimum SSO SAML configuration included, just to have the instance up & running and the metadata URL available. To achieve this, the main requirement is to have configured PACTFLOW_SAML_AUTH_ENABLED. The section for your SSO environment variables could look like this when deploying your container:
#SSO SAML
- name: PACTFLOW_SAML_AUTH_ENABLED
  value: 'true'
- name: PACTFLOW_SAML_ISSUER
  value: 'https://dev.pactflow.com'
- name: PACTFLOW_SAML_IDP_NAME
  value: 'SSO Login'
- name: PACTFLOW_SAML_IDP_METADATA_URL
  value: 'https://fake-url.com/metadata'
- name: PACTFLOW_SAML_IDP_ID_ATTRIBUTE
  value: 'http://schemas.microsoft.com/identity/claims/objectidentifier'
- name: PACTFLOW_SAML_EMAIL_ATTRIBUTE
  value: 'http://schemas.xmlsoap.org/ws/2005/05/identity/claims/emailaddress'
- name: PACTFLOW_SAML_NAME_ATTRIBUTE
  value: 'http://schemas.microsoft.com/identity/claims/displayname'
- name: PACTFLOW_SAML_FIRST_NAME_ATTRIBUTE
  value: 'http://schemas.xmlsoap.org/ws/2005/05/identity/claims/givenname'
- name: PACTFLOW_SAML_LAST_NAME_ATTRIBUTE
  value: 'http://schemas.xmlsoap.org/ws/2005/05/identity/claims/surname'
- PACTFLOW_SAML_ISSUER: This is just an id for your application. It’s used to identify your application on the IdP side. It should be unique. From our side, to keep it simple, we tend to use the PactFlow DNS/FQDN.
-
PACTFLOW_SAML_IDP_NAME: This is the text that will be used as a link to the IdP SSO URL on the login page. We tend to use just “SSO Login” text because many developers will not even know they are relying on Azure AD or Ping for the login process.
- PACTFLOW_SAML_IDP_METADATA_URL: This should theoretically point to the metadata URL published by the IdP provider. That will be shared by the IdP once PactFlow is configured as SP. In our case, we don’t have this information yet so we should include a fake URL.
- PACTFLOW_SAML_XXX_ATTRIBUTE: List of attributes required by PactFlow to map the user information when creating users in its own database. The values of these fields should be agreed upon with the IdP provider, they are responsible for specifying the attribute value where you should gather that information. In the example, we put some typical values from Azure AD. You may have this information at this point, or not, just keep in mind that you should update them if you didn’t set the correct values at this moment.
Having this minimum SAML SSO information fulfilled, PactFlow should be able to start up. Nobody will be able to log in, but we will have available the metadata.xml in the following URL: https://<your PactFlow host>/auth/saml/metadata
2. Request registration in your IdP
If we take into consideration the values configured in our example, the metadata URL should be available at https://dev.pactflow.com/auth/saml/metadata
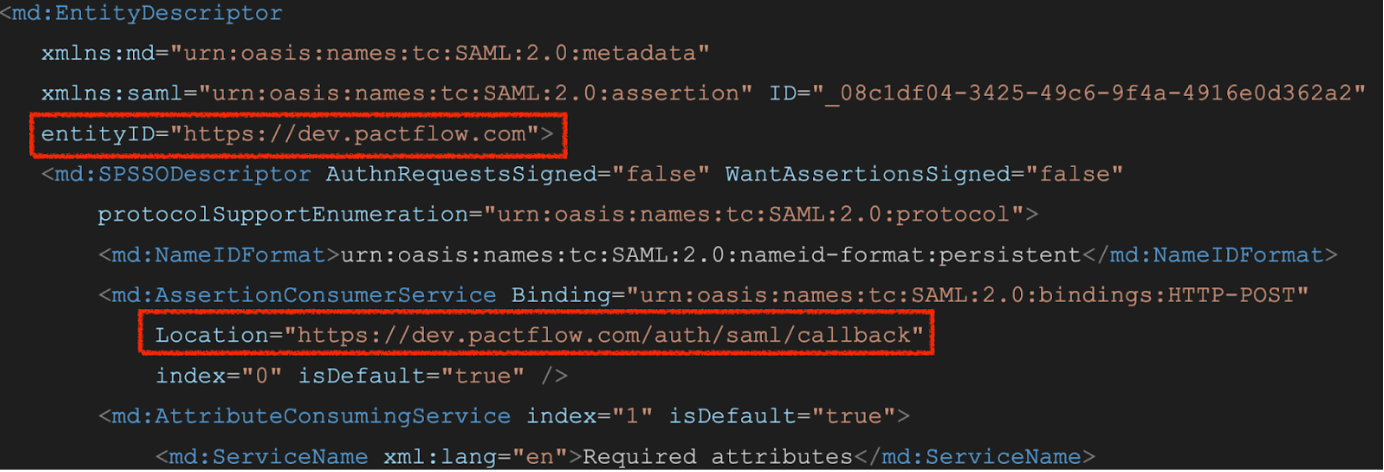
That URL is the value to be shared with the IdP team. If you check the content of that XML, it should have something like
<md:EntityDescriptor
   xmlns:md="urn:oasis:names:tc:SAML:2.0:metadata"
   xmlns:saml="urn:oasis:names:tc:SAML:2.0:assertion" ID="_08c1df04-3425-49c6-9f4a-4916e0d362a2"
   entityID="https://dev.pactflow.com">
   <md:SPSSODescriptor AuthnRequestsSigned="false" WantAssertionsSigned="false"
       protocolSupportEnumeration="urn:oasis:names:tc:SAML:2.0:protocol">
       <md:NameIDFormat>urn:oasis:names:tc:SAML:2.0:nameid-format:persistent</md:NameIDFormat>
       <md:AssertionConsumerService Binding="urn:oasis:names:tc:SAML:2.0:bindings:HTTP-POST"
           Location="https://dev.pactflow.com/auth/saml/callback"
           index="0" isDefault="true" />
       <md:AttributeConsumingService index="1" isDefault="true">
           <md:ServiceName xml:lang="en">Required attributes</md:ServiceName>
           <md:RequestedAttribute FriendlyName="Email address"
              Name="http://schemas.xmlsoap.org/ws/2005/05/identity/claims/emailaddress"
               NameFormat="urn:oasis:names:tc:SAML:2.0:attrname-format:basic"
               isRequired="false" />
           <md:RequestedAttribute FriendlyName="Full name"
              Name="http://schemas.microsoft.com/identity/claims/displayname"
               NameFormat="urn:oasis:names:tc:SAML:2.0:attrname-format:basic"
               isRequired="false" />
           <md:RequestedAttribute FriendlyName="Given name"
              Name="http://schemas.xmlsoap.org/ws/2005/05/identity/claims/givenname"
               NameFormat="urn:oasis:names:tc:SAML:2.0:attrname-format:basic"
               isRequired="false" />
           <md:RequestedAttribute FriendlyName="Family name"
              Name="http://schemas.xmlsoap.org/ws/2005/05/identity/claims/surname"
               NameFormat="urn:oasis:names:tc:SAML:2.0:attrname-format:basic"
               isRequired="false" />
       </md:AttributeConsumingService>
   </md:SPSSODescriptor>
</md:EntityDescriptor>
And this is the step where we could apply a “trick” to avoid the initial dummy deployment. Once you have identified with the IdP team the attributes, the only change in your metadata XML in different environments is the callback URL and the entity Id. Both of them are known by your team before deployment, so if your IdP team accepts a metadata XML file (not forcing you to provide the published URL) you can save some precious time by updating those values manually for each new environment.
3. Request registration in your IdP
Once the registration is complete, we should receive from the IdP team their metadata and the SSO URL.
There are two possible situations:
- IdP team shares the metadata in a URL. In this case, the SSO URL used to be included in the published metadata.
- IdP team shares the metadata as an XML file. In this case, they use to provide the SSO URL separately.
The SSO Url could be something similar to: https://idpservice.com/idp/startSSO.Ping?PartnerSpId=https%3A%2F%2Fdev.pactflow.com
As you can see, the PartnerSpId corresponds to the value we configured in our deployment as PACTFLOW_SAML_ISSUER. This example SSO URL is based on Ping approach.
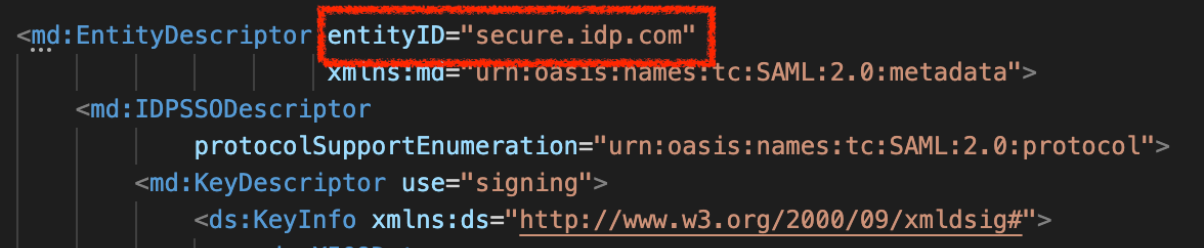
The metadata XML file will have a structure similar to the following:
<md:EntityDescriptor entityID="secure.idp.com"
                    xmlns:md="urn:oasis:names:tc:SAML:2.0:metadata">
   <md:IDPSSODescriptor
           protocolSupportEnumeration="urn:oasis:names:tc:SAML:2.0:protocol">
       <md:KeyDescriptor use="signing">
           <ds:KeyInfo xmlns:ds="http://www.w3.org/2000/09/xmldsig#">
               <ds:X509Data>
                   <ds:X509Certificate>
                       MIIDxTCCAq2gAwIBAg.....NLR9N4jtGulF
                   </ds:X509Certificate>
               </ds:X509Data>
           </ds:KeyInfo>
       </md:KeyDescriptor>
       <md:KeyDescriptor use="encryption">
           <ds:KeyInfo xmlns:ds="http://www.w3.org/2000/09/xmldsig#">
               <ds:X509Data>
                   <ds:X509Certificate>
                       MIIDxTCCAq2gAwIBAg.....NLR9N4jtGulF
                   </ds:X509Certificate>
               </ds:X509Data>
           </ds:KeyInfo>
       </md:KeyDescriptor>
       <md:NameIDFormat>urn:oasis:names:tc:SAML:2.0:nameid-format:persistent
       </md:NameIDFormat>
       <md:NameIDFormat>urn:oasis:names:tc:SAML:2.0:nameid-format:transient
       </md:NameIDFormat>
       <md:NameIDFormat>urn:oasis:names:tc:SAML:1.1:nameid-format:emailAddress
       </md:NameIDFormat>
       <md:NameIDFormat>urn:oasis:names:tc:SAML:2.0:nameid-format:encrypted
       </md:NameIDFormat>
       <md:NameIDFormat>urn:oasis:names:tc:SAML:1.1:nameid-format:unspecified
       </md:NameIDFormat>
       <md:SingleSignOnService
           Binding="urn:oasis:names:tc:SAML:2.0:bindings:HTTP-Redirect"
           Location="https://secure.fhlmc.com/idp/SSO.saml2" />
       <md:SingleSignOnService
           Binding="urn:oasis:names:tc:SAML:2.0:bindings:HTTP-POST"
           Location="https://secure.fhlmc.com/idp/SSO.saml2" />
       <md:SingleLogoutService
           Binding="urn:oasis:names:tc:SAML:2.0:bindings:HTTP-Redirect"
           Location="https://secure.fhlmc.com/idp/SLO.saml2" />
       <md:SingleLogoutService
           Binding="urn:oasis:names:tc:SAML:2.0:bindings:HTTP-POST"
           Location="https://secure.fhlmc.com/idp/SLO.saml2" />
   </md:IDPSSODescriptor>
   <md:ContactPerson contactType="administrative">
       <md:Company>FakeCompany</md:Company>
   </md:ContactPerson>
</md:EntityDescriptor>
4. Update PactFlow configuration
With the information received from the IdP team, we can complete our deployment setup. Our final configuration will be different depending on how the IdP team has shared their metadata with us.
Metadata URL is provided by the IdP team
You’re lucky, this is the simplest path. You will just need to add that URL as PACTFLOW_SAML_IDP_METADATA_URL and your final configuration will be pretty similar to the dummy deployment one we shared before. Let’s suppose the IdP metadata URL is: https://idpservice.com/idp/pactflow/metadata
#SSO SAML
- name: PACTFLOW_SAML_AUTH_ENABLED
  value: 'true'
- name: PACTFLOW_SAML_ISSUER
  value: 'https://dev.pactflow.com'
- name: PACTFLOW_SAML_IDP_NAME
  value: 'SSO Login'
- name: PACTFLOW_SAML_IDP_METADATA_URL
  value: 'https://idpservice.com/idp/pactflow/metadata'
- name: PACTFLOW_SAML_IDP_ID_ATTRIBUTE
  value: 'http://schemas.microsoft.com/identity/claims/objectidentifier'
- name: PACTFLOW_SAML_EMAIL_ATTRIBUTE
  value: 'http://schemas.xmlsoap.org/ws/2005/05/identity/claims/emailaddress'
- name: PACTFLOW_SAML_NAME_ATTRIBUTE
  value: 'http://schemas.microsoft.com/identity/claims/displayname'
- name: PACTFLOW_SAML_FIRST_NAME_ATTRIBUTE
  value: 'http://schemas.xmlsoap.org/ws/2005/05/identity/claims/givenname'
- name: PACTFLOW_SAML_LAST_NAME_ATTRIBUTE
  value: 'http://schemas.xmlsoap.org/ws/2005/05/identity/claims/surname'
Metadata is provided as an XML file by the IdP team
This is the most common scenario. In this case, we cannot use PACTFLOW_SAML_IDP_METADATA_URL, so our option will be to use the following three variables:
This Url should have been provided by the IdP team, in our example, we will use the following value: https://idpservice.com/idp/startSSO.Ping?PartnerSpId=https%3A%2F%2Fdev.pactflow.com
Entity ID from the IdP provider, we can have that value from the entityId attribute in the IdP metadata.
This will be the SHA1 fingerprint of the certificate used for communication with the IdP. To have this value, we should use the certificate included in the metadata:
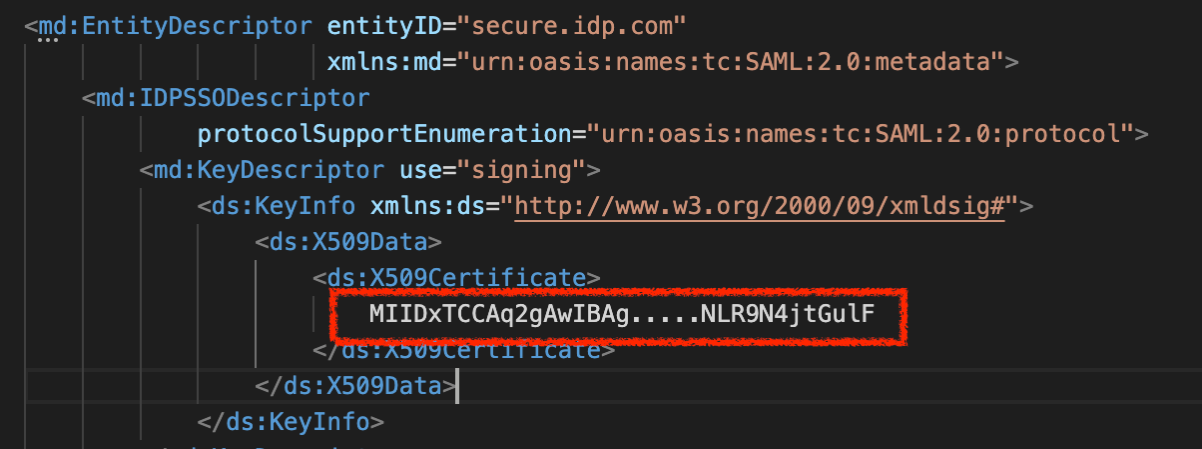
With that value, we will be able to generate the SHA1 fingerprint, following the next steps:
Isolate the certificate into a .crt file
Just copy and paste the certificate value in a new file including the certificate headers:
\-----BEGIN CERTIFICATE-----
MIIDxTCCAq2gAwIBAg.....NLR9N4jtGulF
\-----END CERTIFICATE-----
Use OpenSSL to generate the SHA1 fingerprint
> openssl x509 -noout -fingerprint -sha1 -inform pem -in [certificate-file.crt]
The output of that command will be something similar to 1E:DD:AD:32:C3:54:3F:C3:6F:7F:94:51:8D:5E:F7:ED:7C:DB:5D:A5
At this point, we already have the three values we need to finish our configuration, following our example values it should be something like:
#SSO SAML
- name: PACTFLOW_SAML_AUTH_ENABLED
  value: 'true'
- name: PACTFLOW_SAML_ISSUER
  value: 'https://dev.pactflow.com'
- name: PACTFLOW_SAML_IDP_NAME
  value: 'SSO Login'
- name: PACTFLOW_SAML_IDP_SSO_TARGET_URL
  value: 'https://idpservice.com/idp/startSSO.Ping?PartnerSpId=https%3A%2F%2Fdev.pactflow.com'
- name: PACTFLOW_SAML_IDP_SSO_ENTITY_ID
  value: 'secure.idp.com'
- name: PACTFLOW_SAML_IDP_SSO_CERT_FINGERPRINT
  value: '1E:DD:AD:32:C3:54:3F:C3:6F:7F:94:51:8D:5E:F7:ED:7C:DB:5D:A5'
- name: PACTFLOW_SAML_IDP_ID_ATTRIBUTE
  value: 'http://schemas.microsoft.com/identity/claims/objectidentifier'
- name: PACTFLOW_SAML_EMAIL_ATTRIBUTE
  value: 'http://schemas.xmlsoap.org/ws/2005/05/identity/claims/emailaddress'
- name: PACTFLOW_SAML_NAME_ATTRIBUTE
  value: 'http://schemas.microsoft.com/identity/claims/displayname'
- name: PACTFLOW_SAML_FIRST_NAME_ATTRIBUTE
  value: 'http://schemas.xmlsoap.org/ws/2005/05/identity/claims/givenname'
- name: PACTFLOW_SAML_LAST_NAME_ATTRIBUTE
  value: 'http://schemas.xmlsoap.org/ws/2005/05/identity/claims/surname'
Congratulations!! at this moment you should have already your PactFlow instance up & running with SAML SSO configured 🙂
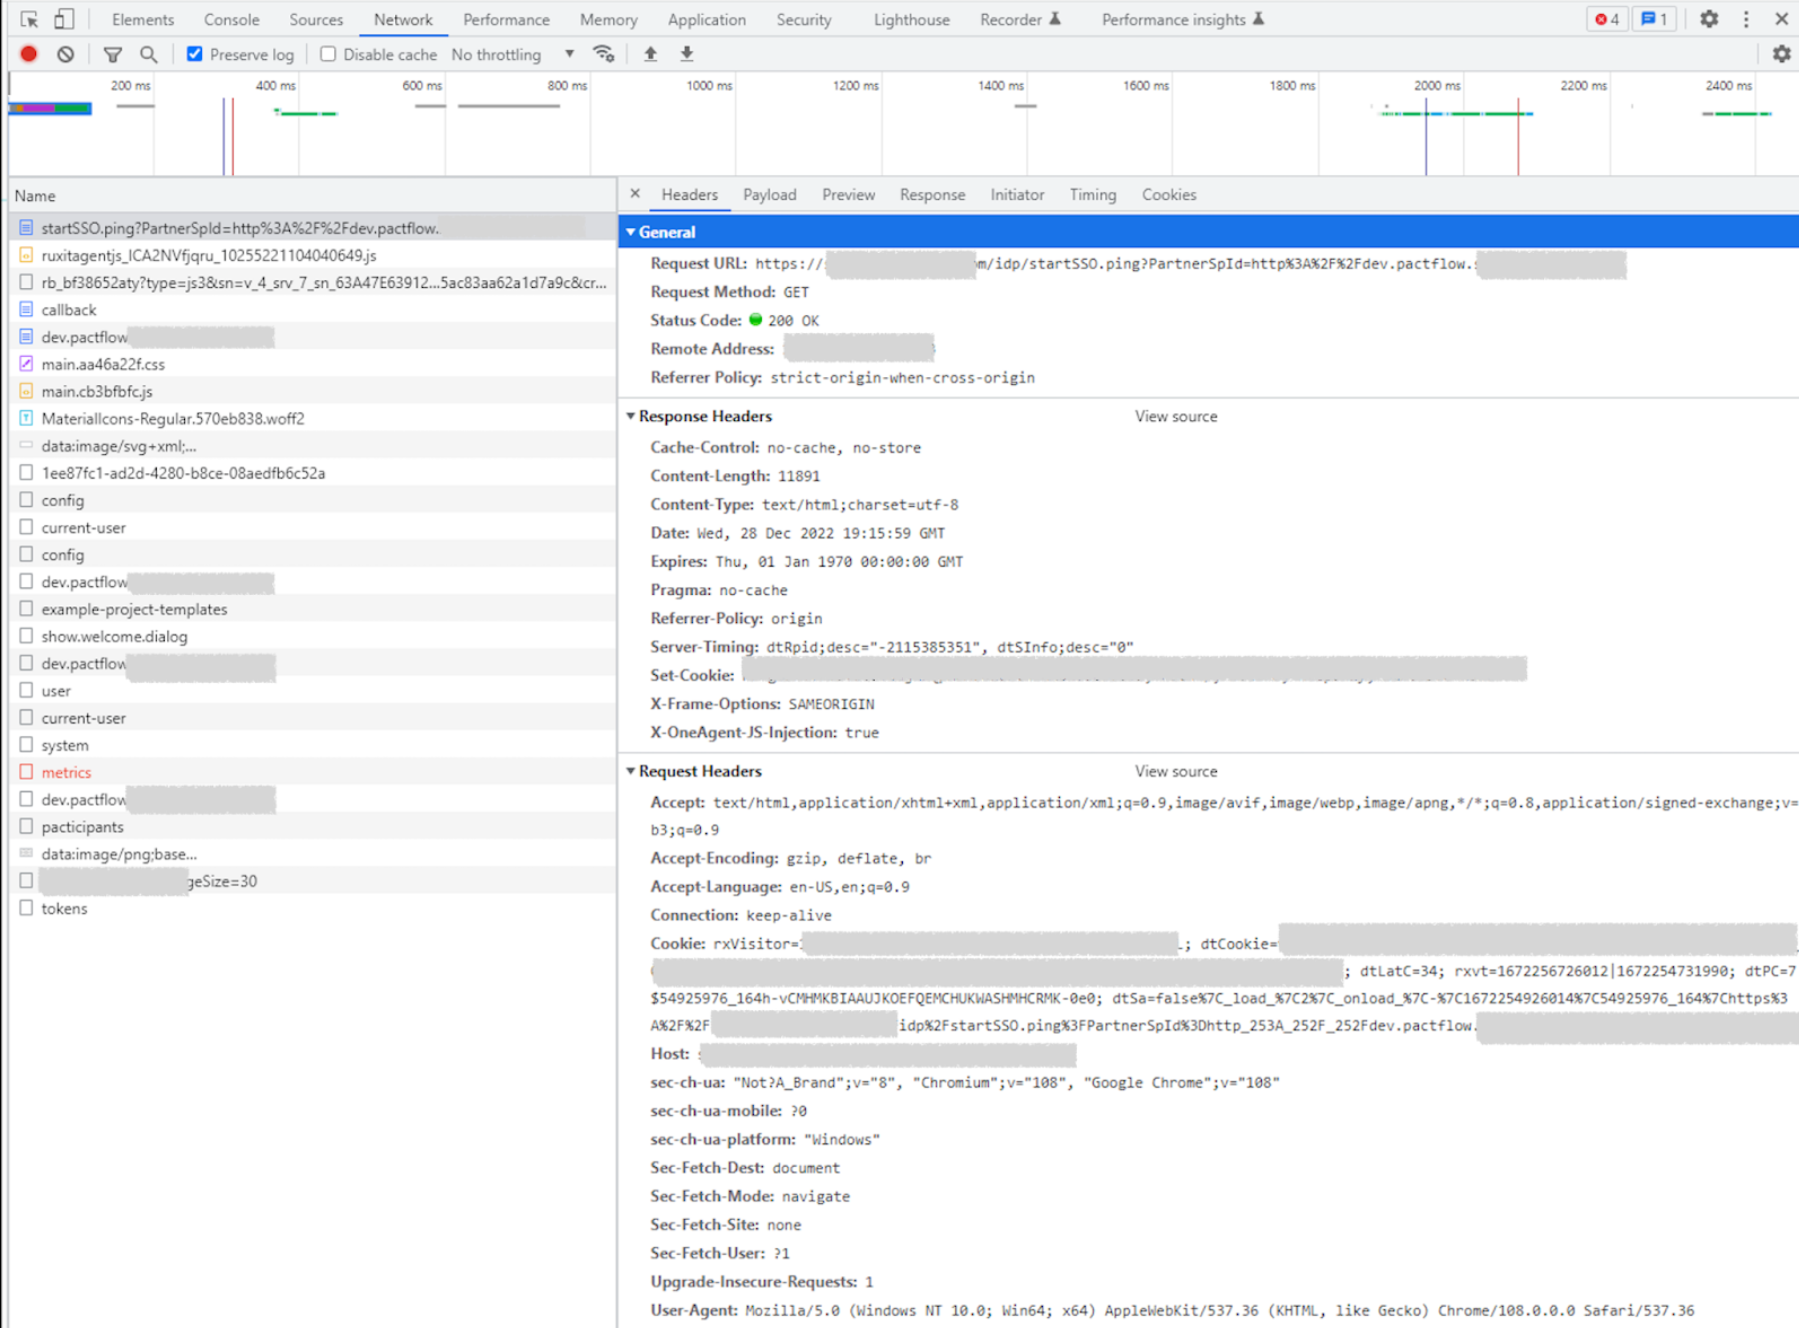
Troubleshooting
The simplest approach to troubleshooting any issues arising after configuration involves using your browser’s developer tools to examine the traffic between PactFlow and the IdP. The two primary elements to verify are the SSOLogin request (initiated by PactFlow to IdP) and the callback (from IdP back to PactFlow).
PactFlow SSO Login request
To be honest, I have never faced any problem with this request, but it’s mandatory to mention that this is the one related to the request from PactFlow to the IdP. If you encounter communication issues with the IdP platform, or if they are lacking any information from you, this should be your first point of investigation.
Idp callback to PactFlow
In the response from the IdP, we will have more information that could be useful for troubleshooting. Decoding the base64 payload allows us to access the assertion response.

The assertion response is a pretty big XML that will contain some useful details like callback destination, Idp issuer, assertion instant, the validity time frame of the assertion, and the different attributes requested by our configuration (IdP ID, name, email…). The full content of this payload is signed using the certificate whose fingerprint has been included in our configuration.
The content of the assertion is pretty big so we will not include an example snapshot, but it’s not complicated to identify what could be causing you issues if you have gotten to this point.
Conclusions
As we’ve observed, the configuration and process aren’t overly complex yet have unique aspects. On the other hand, this is a mandatory configuration in every On-Premise PactFlow deployment and when I first started to work with PactFlow, I was not able to find much information related. Although the configuration or process may closely resemble those of other applications, I discovered the absence of a step-by-step guide to be a significant time drain. The idea behind this article creation is to save time for anyone struggling with this SSO setup out there, and probably even help myself in the future.